How to install ip camera with nvr and poe switch?
Installing an IP camera system with an NVR (Network Video Recorder) and a PoE (Power over Ethernet) switch is a straight forward process. Here are the general steps to guide you through the installation:
Materials you will need:
IP cameras (with PoE support or PoE injectors if not PoE-ready)
PoE switch
NVR (with sufficient channel capacity to support the number of cameras you have)
Ethernet cables (Cat 5e or Cat 6)
Monitor or a display device to connect to the NVR for initial setup
Power adapter for the NVR
Mouse and/or keyboard (if required for NVR setup)
Step 1: Positioning the cameras
Decide on the locations where you want to install the IP cameras. Ensure they have a clear view of the areas you want to monitor and have access to power outlets or use PoE if supported.

Step 2: Connect the PoE switch to the NVR
Connect one end of an Ethernet cable to one of the PoE switch ports and the other end to the Ethernet port on the NVR. This will enable communication between the cameras, the NVR, and the network.

Step 3: Connect the PoE switch to your network
Connect the PoE switch to your local network using another Ethernet cable. Plug one end into a LAN port on your router or network switch and the other end into any open port on the PoE switch.
Step 4: Connect the IP cameras to the PoE switch
Using Ethernet cables, connect each IP camera to one of the available PoE ports on the PoE switch. The PoE switch will provide power to the cameras, and the data will be transmitted over the same Ethernet cable.
Step 5: Power on the NVR and cameras
Plug in the NVR and IP cameras to power outlets or use the PoE switch to power the cameras if they support PoE.
Step 6: Configure the NVR
Connect a monitor or display device to the NVR using HDMI or VGA cables. Follow the on-screen instructions to configure the NVR settings, including the date and time, recording settings, and network settings. You may need to use a mouse and/or keyboard to navigate through the NVR's interface.
Step 7: Add the cameras to the NVR
Once the NVR is configured, you need to add the IP cameras to it. Most NVRs have an automatic camera detection feature, which will detect and add the connected cameras automatically. If not, refer to the NVR's user manual for instructions on adding cameras manually.
Step 8: Monitor the cameras
After the cameras are added to the NVR, you should be able to see the live feed from the cameras on the monitor connected to the NVR.
That's it! You have now successfully installed an IP camera system with an NVR and PoE switch. You can access the NVR remotely using a mobile app or a computer to view the camera feeds and manage the system. Please consult the user manuals for your specific NVR and IP cameras for detailed instructions and troubleshooting tips.
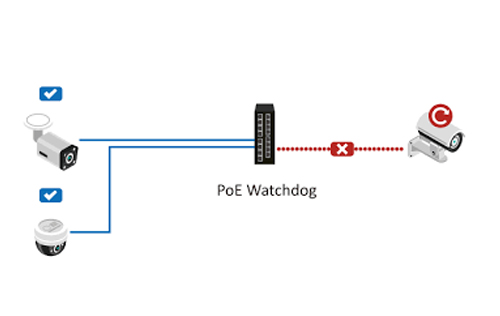
 Do I need a managed switch for PoE cameras?
 How to do PoE troubleshooting?
 SFP Compatibility Guide and How to Use a Compatible SFP Module?

 简体中文
简体中文